Adding Extra Services
Laci Synchroni can connect to more than one service at the same time. This guide shows you how to add extra services to your Laci Synchroni plugin.
Before you start, you will need to find the following from your service provider. For large public syncs, please inquire in the Laci Synchroni discord. For private syncs, please ask the server owner for the details.
You need:
- Service URI - Essentially the web address of the service, for example
wss://example.com. It should start withwss:// - Advanced URI - Is an advanced URI necessary? This is generally needed for all non-Laci servers. Please inquire in Laci discord for public sync services!
- oAuth yes/no - Is oAuth enabled for the service? If you are not sure, you can fall back to secret keys
Configuring the service
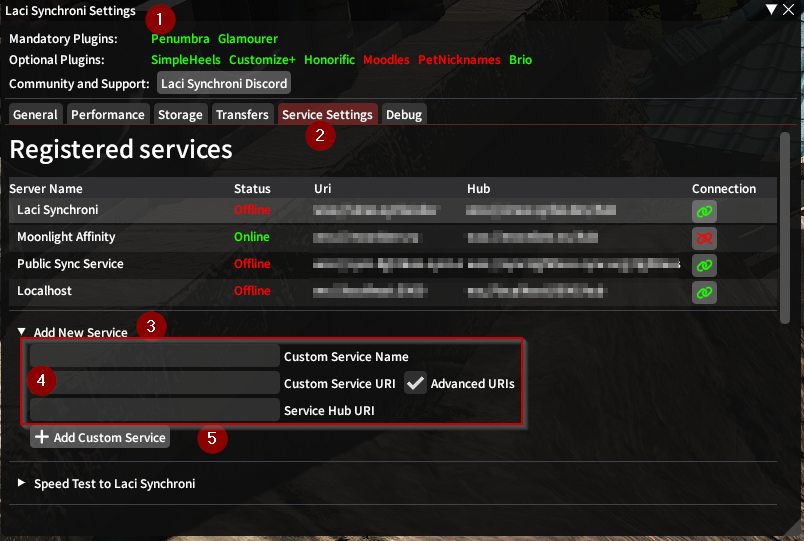
- Open the configuration by using the
/laci settings command - Navigate to
Service settings - Open the
Add New Servicepanel - Enter the configuration for the service:
Custom Service Namecan really be anything, it's just the name of the serviceCustom Service URIis the service URI from above- (Optional, as required)
Advanded URIsandService Hub URIonly needs to be configured if needed, as explained above
- Hit
Add Custom Service
Authenticating
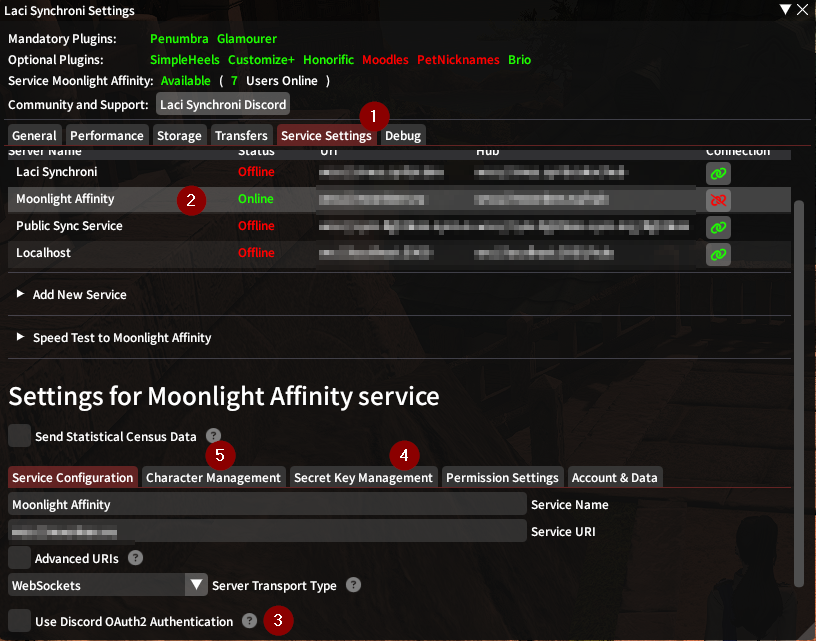
You now have to choose a method of authentication. Typical Services have oAuth2 enabled, but you can also use Secret Keys if you only have a Secret Key.
Authenticating - OAuth2
If your service authenticates with oAuth, you have to authenticate yourself through Discord.
- Go to settings and to
Service Settingsagain. - Select the service you just registered
- Scroll way down until you see
Service Configuration. Tick theUse Discord oAuth2 Authenticationcheckbox - This process takes a few steps, but they are explained in-game. Please start the oAuth process by
clicking the
Check if Server supports Discord OAuth2and follow the steps in-game - After authenticating, go to the
Character Managementtab - Hit
Update UIDs from Server - Assign your UID to all characters as needed
Now you can hit the green connect button at the top to connect to this service.
Authentication - Secret Keys
- Go to settings and to
Service Settingsagain. - Select the service you just registered
- Scroll way down until you see
Service Configuration. Untick theUse Discord oAuth2 Authenticationcheckbox - Go to
Secret Key Managementand add a new key - Go to
Character Managementand add that key to the current character